
Mixing
Mix Ratios
The correct mix ratio (cement: sand: stone) depends on the type of application; harder concrete requires more cement, rougher applications require more aggregate. The ratios given below are guidelines: best proportions may depend on the quality of sand/stone used.
First put in the water - around 7 litres (1½ gallons), using more or less depending on the type of mix required. Add some aggregate before adding cement, to avoid sticking. Work consistently to the ratio of ingredients for whatever type of concrete mix you are working to.
| Application | Qualities | ||
|---|---|---|---|
| Cement | Sand | Stone | |
| Most ordinary | 1 | 2 | 4 |
| Foundations | 1 | 3 | 6 |
| Rough Mass Concrete | 1 | 4 | 8 |
| Waterright floors, tanks, pits, etc | 1 | 1.5 | 3 |
Getting a good mix
The approximate mixing time for concrete is 2-4 minutes from when all the material (including the water) has been added - over-mixing can reduce strength and cause segregation of the coarser aggregates.
Beware of low grade aggregates; these will only lead to trouble later on with sinking and frost spoiling the appearance of the pour.
Also do not get the concrete mix too wet as this can reduce strength and make it less able to withstand weathering.
Looking after your mixer
Never throw material into the mixer - trickle it steadily over the rim or it will stick firmly to the back of the drum and can only be dislodged by stopping the mixer.
Keep your mixer clean - material left in the drum will harden, and attract more on each use until the mixer is useless.
Do not throw bricks into a mixer drum to clean it out. The best method is a mix of 1" (2½cm) gravel and clean water - use plenty of it, as this will do the job in half the time.
Mixer capacities
| BWE | Commodore | Minimix | Maxi | Minimix | ||||||||
| 80 | 110 | 130 | 150 | 200 | 260 | 5:3½ | 7:5 | 10:7 | 130 | 140 | 140 | |
| Cu. Ft. | 4:3 | 5:3½ | 6:4 | 10½:5 | 12:7 | 14:9 | 5:3½ | 7:5 | 10:7 | 4:3 | 4:3 | 4:3 |
| Litres | 130:80 | 165:110 | 180:130 | 300:150 | 350:200 | 400:250 | 150:105 | 210:150 | 300:210 | 130:90 | 130:90 | 130:90 |
| Minimix | Minor | Premier XT | Superior | TBE | Tract-Mix | |||||||
| 150 | 100 | 150 | 175 | 200 | 300 | 350 | 400 | 130 | 165 | |||
| Cu. Ft. | 4:3 | 4:3 | 5:3½ | 7:5 | 8:6 | 10:7 | 10½:5 | 12:7 | 14:9 | 4:3 | 5:3½ | 10½:5 |
| Litres | 130:90 | 120:90 | 160:110 | 220:160 | 250:180 | 310:220 | 300:150 | 350:200 | 400:250 | 130:80 | 165:100 | 300:150 |
- Cubic feet and litres are a ratio of – Input (dry material) : Output (wet mix)
Pokers
Thorough compaction – removal of air – is essential for concrete to achieve full strength and therefore durability. The most effective way of achieving this for a wide variety of applications is the efficient use of a vibrating poker.
Concrete should be placed in layers no more than 450mm deep and each layer should be vibrated fully before the next layer is placed. This ensures the air bubbles can rise to the surface and don't get trapped under a layer of concrete that isn't being vibrated. The next layer has to be vibrated before the previous layer has hardened. The poker should go in to the first layer by about 100mm to ensure a good bond between the two layers.
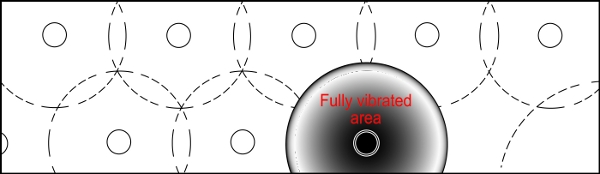
The poker should be inserted vertically into the concrete. An area around the poker will be fully compacted. The size of this area depends on a number of factors; size of the poker, frequency and amplitude, slump of the concrete, aggregate and admixtures, amount and size of reinforcement bars, distance from the formwork.
By watching the surface of the concrete around the poker, the size of the full area of the compaction circle can be determined. For full compaction the poker should be inserted at intervals so these circles overlap.
Slowly withdraw the poker vertically from each position allowing the void left by the poker to fill.
In normal circumstances to not drag the poker through the concrete as pockets of air are likely to be trapped.
Do not over vibrate, holder the poker in place for too long will cause the aggregate, sand and cement to separate out and reduce the strength of the concrete.
Choosing a vibrator
The size of the job and the power supplies available on site will determine which type of poker to use.
Hand held, small jobs powered by mains electric or a generator
Pneumatic pokers, powered by a standard site compressor
Flexible shaft pokers, used with a dedicated petrol or diesel drive unit
Electric high frequency, 230v or 400v 3ph converted to 42v.
The selection of head size is determined by the application. Small diameters for small concrete volumes, large diameters to increase productivity on large pours. The distance between rebars and ease of handling should also be considered before selecting the larger sizes.
Screeds
A practical technique for laying large or small concrete slabs, free from the restrictions of formwork, screed rails or shuttering. |
| It’s not magic, it’s an easy technique for operators to master and it will save you time and money. |
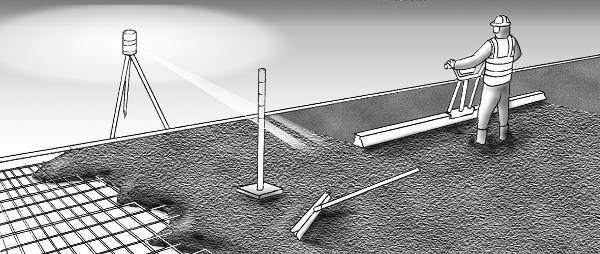
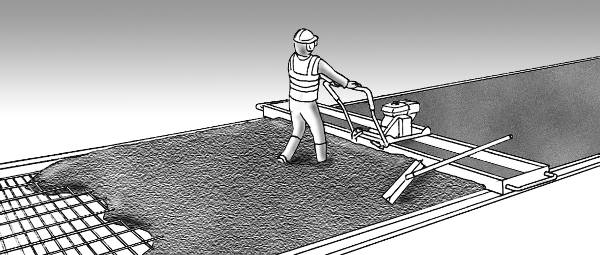
3 Steps to ‘Free Screed’ with an Easy Screed:
Step 1: Pour and poker the concrete
Step 2: rake out to the right level
Step 3: Vibrate, smooth and finish
The benefits add up for ‘free screeding’:
• |
| No accurate formwork required |
| • |
| Lay the whole slab in one day |
• |
| Save hours/days on setting up |
| • |
| Lay slabs without joints |
• |
| No limiting bay widths |
| • |
| Easy work around obstacles |
2 for 1
When you buy an Easy Screed for ‘free screeding’ you get a unique bonus: | ||||
 | ||||
By reversing the beam the Easy Screed is transformed in to a traditional beam screed. So you can strike-off with an Easy Screed as well! Note: This added feature is only available with the Easy Screed from Belle Group | ||||
Free Screed Traditional Screed | ||||
More Use It only takes seconds to change beams, so you can always have an Easy Screed with the perfect beam width. An Easy Screed will ‘free screed’ or traditional screed from 1.5 to 6m, giving you the highest potential utilisation. | ||||
 | ||||


Trowels
For final finishing of concrete floors, power trowelling gives by far the best results for strength, durability and flatness. Using a power trowel, concrete can be finished off to a very hard and durable surface.
Remember that a power trowel will not level a concrete floor. A power trowel is a finishing machine designed to put a hard skin onto the surface of the concrete which is smooth and reasonably dust free.
Small holes and slight high spots can be levelled off by the action of the trowel, but a floor should generally be laid, levelled and compacted before a trowel is used. Double beam screeds, straight edges, and hand troweling of edges and main joints should be done prior to power trowelling.
Selecting power trowels
Power trowels are almost always either petrol or electrically driven; the choice depends on the power supply available and the area in which the machine is being used. (Trowels are designed for one or the other; fitting a petrol drive to an electric trowel, or vice versa, will give poor results).
Drive units vary between about 5hp and 25hp. Usually 5-10hp are used for walk-behind trowels, and 10-25hp for the larger ride-on trowels.
Trowels are available in various sizes. The most popular sizes are:
diameter | suitable for |
600mm or less | final screeds and refurbishment work; for working through doorways in finished buildings |
800-1200mm | most common applications such as factories, warehouses, airport hangars, etc |
900-1200mm double head | larger floors areas where high quality finish is required |
The most important feature in a power trowel is its ability to run smoothly and be well balanced. Make sure there is a simple method of ensuring that the blades are level, and a quick method of adjusting them if they do become out of line. A trowel with non-aligned blades becomes unstable, and will make it impossible for the operator to achieve a good finish which meets specifications.
Safety standards are becoming more and more strict, so ensure trowels have adequate guards. Triple guard rings, engine cutout switches, and electrical protection are to be recommended.
Selecting blades
Trowels can be fitted with various types of blades or discs:
Floating: | ||
| Float blades | Used first for floating |
| Float disc | Alternative to float blades |
Finishing: | ||
| Finish blades | Used for two or more passes for final finish |
Combined: | ||
| Combination blades | One side used for floating, the other side for finishing |


Most commonly, float blades or a disc are used followed by finish blades.
Combination blades are normally only used on small contracts - using two types of blade usually ends up cheaper.
Trowels
It is essential to trowel at the correct time. The operator must wait until the soft concrete hardens sufficiently to take the weight of the machine and in most cases the operator as well.
If the concrete is too soft the machine will tear up the surface; if it is too hard, the machine will have little effect on the surface.
A useful guideline is when the operator can stand on the concrete surface and leave footprints of about 3mm depth.
Floating: The first pass is called the 'floating' pass. The trowel is fitted with either float blades or floating disc. Trowelling starts at the top of the slab and moves from one side of the concrete bay to the other, with the operator walking backwards (the trowel will take out the operators footprints). The bay should be given one initial pass and the speed of travel should be slow and uniform.

For the floating pass, the trowel blades should be almost flat to create suction between float blade and concrete surface. After the first pass there will be circular marks left on the surface. These should not be deep marks, and will be removed on the second pass. The trowel should pass over the form work to ensure level joints.
Finishing: Once the surface has been 'floated', the blades of the trowel are changed to finish blades. The finish pass should be started when the surface has dried off, and walking on the surface leaves no appreciable indentations. A good guideline is when the operator can place his hand on the concrete surface and no sand/cement particles are left on his hand.
For the finishing pass the blades are angled to suit the concrete, increasing the angle after each pass - an angle of around 5-10º is usual, the steeper the angle the harder the finish. Several passes with the finish blades may be required to achieve the specified finish.
General
Care must be taken at all stages of trowelling to ensure that all areas of the concrete are covered by the trowel. In most cases hand trowelling of the edges, joints, around columns and at walls should be done prior to floating. This makes sure that no large high spots are evident (power trowels will not take off high points).
Where levels are critical, hand levelling beams are often passed over the surface to ensure that there are no high spots. This hand level (usually 3-5 metres wide) will also remove surplus material after the floating pass, making the final finishing pass much easier to do.
Weather: A warm dry day with slight wind gives the best curing conditions. A cold damp day is the worst.
There is no substitute for good quality concrete, care in preparing the formwork, correct compaction, initial levelling and care and patience in the final finishing of all the surface area.
Using the correct tools, an extremely good quality product can be achieved.